How an Open Source POS Streamlined Barcode Workflows With Barcode to PC
Independent developer wanted a simple way to recommend a reliable scanning companion to users of his open source Point of Sale (POS) system. Manual USB scanners created friction (driver issues, single device limits, lack of context data). He needed a cross platform, low maintenance solution that let contributors test quickly and store clean structured data. Barcode to PC became the bridge between smartphones in the field and a POS running on a desktop or laptop.
Context: The Integration Goal
The POS project allows small retailers to track items, record sales, and manage lightweight inventory without vendor lock in. The missing piece was fast data entry for barcodes plus a way to enrich each scan with session metadata (who scanned, when, optional quantity). Rather than building and maintaining a native scanning stack, the developer evaluated existing tools and picked Barcode to PC for its:
- Immediate multi device pairing (several phones to one workstation)
- Flexible Output Template system for structured output
- Direct CSV friendly output usable by scripts or spreadsheet imports
- Offline friendly collection with later sync to the POS host
Designing a Minimal Output Template
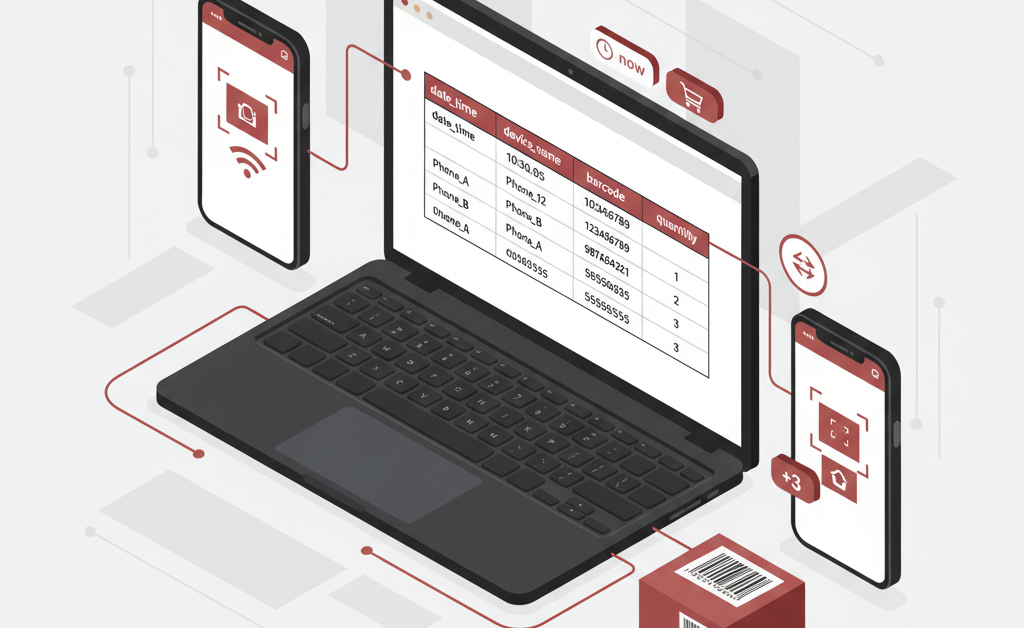
The POS workflow only needed a few data points per line. Keeping the template compact made onboarding easy for non technical store staff. The final template used these core components:
- BARCODE (the item code)
- DATE_TIME (precise timestamp for audit and sales timing)
- NUMBER (quantity when selling multiples)
- DEVICE_NAME (which phone scanned it, useful for distributed counters)
This yields a consistent logical column order: date_time, device_name, barcode, quantity.
Example CSV Line Output
When the template runs, each scan appends a line similar to:
2025-09-28 10:14:07,FrontCounterPhone,0841133100123,2
The POS import script simply maps:
- date_time maps to transaction_time
- device_name maps to operator_id (lightweight identification)
- barcode maps to sku
- number maps to quantity
Mapping guidance for numeric or quantity fields follows the same approach described in the map columns guide.
Why DEVICE_NAME Matters
Multiple smartphones can submit scans to the same computer. By including DEVICE_NAME the POS can attribute actions to a physical station without forcing every operator to type a user code each time. Devices are renamed in the app settings once, then the variable device_name becomes available for filenames or rows. See how filenames can incorporate it in the component example.
Setting Up the Template
- Create a new Output Template.
- Add BARCODE, DATE_TIME, NUMBER, and DEVICE_NAME components in that order.
- Set the NUMBER label to QUANTITY if you want a readable column, following the pattern shown in the mapping example.
- Choose CSV as the output format directing it to a shared folder (optionally using
{{ device_name }}in the filename for per device separation). - Pair each smartphone and perform a quick test scan to validate column alignment.
Developer Bundling Consideration
The maintainer wanted to distribute a frictionless starter toolkit: POS code plus a scanning helper. Two approaches were considered:
- Bundle the free Barcode to PC installer with attribution and link to upgrades
- Provide a direct link to the official download page only
Linking only keeps distribution size small and ensures users always fetch the latest version. Bundling can reduce first run steps for less technical users. Whichever path is chosen, clear attribution and a link to the official site preserves brand recognition and clarifies ownership.
Outcome
After integrating the template, new contributors could scan inventory batches in minutes. Error prone retyping was eliminated, multi device coverage improved peak hour throughput, and the POS code base remained lean by delegating scanning complexity to a dedicated tool.
Key Takeaways
- Focus on the smallest data set that drives the POS logic
- Leverage core components first before adding advanced logic
- Name devices early to gain effortless operator attribution
- Use CSV output for transparent onboarding and easy scripting
Next Step
Create your own minimal Output Template and test a real scan workflow. Start with BARCODE, DATE_TIME, NUMBER, and DEVICE_NAME, then import the resulting CSV into your POS or spreadsheet to validate the flow.